|
|
|
BACKGROUND ABOUT THE CAMERA:
The Sony Digital Mavica line of camera hit the market in the Summer of 1997. This is an impressive camera in the digital marketplace, for an average price of about $650 in the U.S. (available in Japan for less than $600 due to rate-of-exchange):
640x480 pixel image area for ALL camera settings
24-bit color pictures stored on a removable 3.5" HD PC floppy diskette
LCD display (2.5" TFT) with brightness adjustment
Standard (50% compression) and Fine (25% compression) modes of recording
Optical Zoom for 10x telephoto (40mm to 400mm effective focal length)
Wide-Angle in focus at the camera lens
Built-in Flash, recommended for 2 to 4 meters
Two-level shutter button to hold the exposure setting while adjusting final framing
Auto Exposure plus three additional settings above and below the normal setting
Auto Focus plus Manual Focus
Auto white-balance
Self-Timer - 10 seconds
Five pre-set exposure settings (Program button):
Soft Portrait, Sports (1/4000 second shutter), Beach & Ski, Sunset & Moon, Scenery
Five color choices (Picture Effect): Full color, Pastel, Negative, Sepia, B&W
Picture Playback with index for each six pictures and menu to protect or delete
Five-way "navigation" button for left/right, up/down and click actions
InfoLithium long-lasting battery with remaining-minutes display
TWENTY FACTS FROM ONE
USER VIEWPOINT:
1. Exceptional battery life. I have taken 275+ photos over
3 days on a single full charge.
2. Battery charger is light weight and accepts a wide variety
of voltages and line frequencies. Mine worked well in Australia,
Poland and Italy with nothing other than a simple plug adaptor.
3. There are over 2000 different combinations of picture settings
available. However using it in it's "normal" mode works
fine most of the time.
4. In Fine mode the jpg compression is 25% (75% quality);
in Standard mode the jpg compression is 50% (50% quality.)
5. In Field mode the ccd is scanned once so the resolution
is halved. In Frame mode the full 640x480 is achieved by
two interleaved scans.
6. Autofocus works fine in bright light but gets progressively
worse in low light. Pressing the shutter release repeatedly to
the focus point causes the focus to improve a bit. Switch to manual
focus in low light.
7. Autofocus in Macro mode is marginal. Switch to manual.
8. The unit puts the same name on the photos on each disk. If
you copy to a storage device the names need to be changed or many
directories created. (See DCCS, below.)
9. There is a single image self timer (10sec).
10. No remote shutter control although it looks as if the
case is designed for one.
11. According to Sony there is no AC adaptor, but the Handycam
infoLithium ac unit works just fine. Small plastic pullout on
the camera makes room for the cord.
12. The flash is ridiculously overpowered. Several work
arounds have been discussed. I just put a finger over the flash
on the rare occasion I use the flash.
13. Low light pictures are very decent if manual focus
is used. Xmas tree light only in a room produced acceptable results.
14. The file sizes on disk are from 20K to 100K depending
on the settings and the brightness of the scene. 12-35 pictures
to a disk is normal. I have gotten as many as 45 on a disk once.
Average is 24.
15. The camera is a bit heavy and seems ackward at first.
After several days it felt very comfortable.
16. The Sony case is OK but the Tamarac case at $35 is
much better. 10 disks, camera and spare battery fit perfectly.
17. In general forget the accessory lenses. The telephoto
appears to be off the market and the wide angle is virtually impossible
to find. Look for the Handycam units in photo stores. Same unit
different name.
18. LCD display is a marginal viewfinder. Difficult or
impossible to see in bright sun. It also provides an innaccurate
image in regard to the brightness. (See LCD topic, below.)
19. Hand strap is poor. Will prevent dropping but dosn't
help in holding the camera. Buy the Handycam strap.
20. The camera will only format diskette as IBM internally. It
writes standard IBM format JPG files that most computers
will read perfectly.
TWO-WEEK POINT-OF-VIEW
I've owned an FD-7 for two weeks. Here's what I think are it's good & bad points:
Good: great at objects (people, bugs, etc.) and can focus on really small things easily, good color resolution, floppies are wonderful as storage media, built like a tank, LCD screen is very nice to look at, good controls, easy to use, a hit at any party, sexy in a hi-tech sort of way, no film !
Bad: Surprisingly bulky, hard to hold steady (zoom shots require tripod), the 640x480 resolution isn't that great: tends to turn curved lines into jagged ones and landscapes come out mostly bad, lcd panel is very hard to see and useless for focusing in bright sunlight, not good in low light, it's expensive. The wide angle lens came with instructions only in Japanese.
My impression is that it would never take the place of a good 35mm and should be judged on it's own merits. I wish the floppy idea would catch on. Cool toy ? Sure...it attracts attention everywhere it's used and it's great fun. Should it be your only camera ? No way. What's it missing ? A video out (double it's use as a computer video camera for conferencing), a cover for the lcd panel...I don't know, the resolution is it's biggest drawback. Even the newer MD-based model that hasn't been released yet has the same resolution. It's fun to use and own...but keep a 35mm handy for the good stuff. Buy one from someone who offers a 30-day return policy so you can try it and decide if it's worth the money for yourself.
BASIC CAMERA TECHNIQUES
Here are a couple of tips which
may help if you are having trouble with your Mavica. They are
only guidelines and will vary with each situation.
1. For indoor shots increase the EV to +1.5 (I have taken many
test shots in my living room at night with only one light on in
the room and the shots turn out very well).
2. For flash shots indoors decrease the EV to -1.5.
3. For flash shots stand at least 6.5 feet from your subject.
If you stand too close the flash tends to wash out the picture.
4. Give the camera at least a second or two to autofocus before
locking the exposure and taking the picture otherwise your shots
might turn out fuzzy.
5. Watch the lcd screen closely to make sure your image is in
focus. At full zoom the camera can't focus closer than about 3.5
feet. At 3/4 zoom the minimum focus distance is about 2.5 feet,
and at 1/2 zoom about 1.5 feet. If you are closer than these distances
to your subject the camera will not be able to clearly focus the
image.
6. Before taking any pictures, adjust the lcd screen brightness
as best you can to match the present light conditions. You will
then be able to see your EV corrections on screen as you change
the EV settings. If you don't, the lcd screen will give you false
sense of how the picture will turn out. This, of course, isn't
really possible outside in bright sunlight.
411 FILES
Q: At the risk of revealing the obvious fact that I am a total novice who just bought my FD7, I would appreciate it if someone will explain why .411 files appear with each shot. I do not understand what they are, or what purpose they serve. Am I making a mistake by deleting them when I save my pictures on my hard disk?
A: They are used by the camera to display the index files when required. The program 4112bmp.exe will make little bmp files from the 411s. The .411 files are the index files that include the date/time info related to the jpeg files. They also contain the image that is viewed on the camera's LCD screen. Someone has written a Windows program to convert them to BMPs so they can be used as thumbnails. I looked at the processing with this program (4112bmp) through the debugger and it shows, that the 411-file contains nothing but a small bitmap. I you remove all these files from a camera diskette, you wil see just empty thumbnails in the index view. On the other hand, if you remove the .jpg files there is no index to see. Also a set of different .411 and .jpg will not work so I think the camera checks the time and date of these files before showing the index pictures. There is no need to put the .411 files on the hard drive.
PICTURE STORAGE
Q: Since I am taking a LOT of pictures, what is a good way to store them, long-term?
A: I wouldn't recommend long term storage on floppies. They're just not stable enough to be trustworthy. I resample my photos to 320x240 too, but just for onscreen viewing. If you're going to print them don't reduce them at all. You'll maintain much better quality full-size.
My experiences with floppies though is from my job; I have floppies I need to travel with and use about 2-3 times a year. These floppies might be used for two to four years and written to many times, storing the files I need to take with me. In the meantime they sit waiting for the next use.
It seems to me that floppies can deteriorate, and that even with reformatting they can get to the point that a disk get get to the point that it works just fine except for just ONE file! Even thought the disk will format just fine, it might corrupt in some spot where it'll become unreliable.
Considering how cheap disks are these days, I just throw away any that I can;t trust anymore. (I also don't trust AOL disks even when brand new. Out of several (6-10?) I've received so far, two of them wouldn't even reformat properly - and got pitched post haste!)
If you have a bunch of floppies and storage isn't a problem, you may try changing your standard setting to fine. That changes the jpeg compression from 50 percent quality (50% compression) to 75 percent quality (25% compression). In fine mode you'll only get about 20 or so pictures on each disk, but the compression is less and the image quality is better.
A: I have invested in a Recordable CD device which allows me to store over 600 megabytes of photos on one CD-Rom for a media cost of about $1.80! I bought one from Sony to fit into my Sony PCV-150 PC and am VERY pleased with it's value and performance.
SOFTWARE
IMAGE SOFTWARE
PHOTO MONTAGE
Q: How can I create a montage of several pictures?
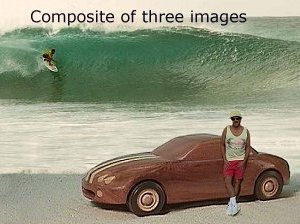
A: Any photo editor with cut and paste abilities will accomplish your goal. I use Paint Shop Pro, it's great for juxtipositioning of images. Load your original, make a duplicate, resample (or resize) that to create a larger image, the cut out the second image using the select tool, move it to your original and paste it. With practice, you can redo the shadows, etc. to gain a semblence of realisim. Here is a composite where I've done something similar; beach scene, model car & self portait.
PICTURE MANIPULATION
Don't open a photo file, manipulate it and resave as a jpeg more than once. Each successive save destroys more picture data. Open it once, then immediately resave it in your editing program's native format as your digital negative, then you can manipulate and resave as jpeg and you'll always have the untouched "negative" to go back to.
I use my camera for my real estate appraisal business. When I print pictures of houses that are red they come out brown or a dark gray. They look fine on the screen. Any advice would be appreciated. I have an Epson Stylus 600 printer.
You need to calabrate your screen and printer. Read the instructions that came with them. (If you look carefully at the other colors they will be off also.) Else, if you like to guess, try color correcting with a graphic program. You can use the one that came with the Mavica or download Paintshop Pro from the net.
Doing a lot of picture taking this weekend, I have come to the realization that the Mavica is a great camera but you have to know what to expect.. It is not going to replace your 35mm for making 8x10 to put on the wall..But it will make some great 3x5 to print out! I found that the raw image that comes out of the camera is like a diamond in the rough!! It has to be polished to really shine.. I have both Adobe photo4.02 and PaintShop Pro.. I like Paintshop because it has fewer bells and whistles and is really user friendly.
Now here is the trick. To enhance the image is a three step process.
#1- use the unsharp filter (keeping the setting below 8 or 9 works best)
#2- then use the sharpen filter(only sharpen once,too many times degrades the image)
#3- Adjust brightness and contrast. (the unsharpen masks brings up the contrast so you may want to fix it a bit)
I have tryed to resample into 1024x768, but I do not think you gain much!
PICTURE SHARPNESS
Q: Why do some pictures look sharp and others do not?
A: What you see on some posted pictures is the "Apperance of Sharpness Syndrome". When you view a Mavica picture straight from the disk at its full 640X480 resolution you realize that this is not a hi res camera like some of the others. You can look at the raw output of some of the hi res cameras and it looks a lot sharper. The picture also is usually a lot bigger in size. Since they look quite sharp in the raw form you see little increase in sharpness as they are reduced in size.
With the Mavica pictures even a 25% reduction to 480X360 fools the human eye into thinking that the picture is a lot sharper. If you grab a lot of the full frame pictures from any site, and put it in a program like Paint Shop Pro you may see they are now 480X360 instead of the original 640X480. Some WebMasters do that to reduce scrolling for some people and to reduce .jpg file size. When you resample in PSP the picture sometimes becomes a little fussy so they normally use one hit on the sharpen filter. Even with the Mavica pictures reduced in size you can usually grab them into a photo program where you can zoom in and see the dreaded jaggies. We call them scan lines but anytime you see a reduced-in-size picture that looks just too sharp to be from a Mavica, zoom in on it in PSP and sure enough there are the "Jaggies".
There is a variation in the near focus range of the zoom lense. Since the zoom incorporates a macro function in the low end of the zoom range the near focus distance varies with the zoom setting. These figures are approximate (I stood on a tape measure to measure my distance from an object) but to give you an idea here are near focus distances for four zoom settings: full zoom - 3 1/2 ft, 3/4 zoom - 2 1/2 ft, 1/2 zoom - 3 inches, no zoom - 3/4 inches. If you weren't aware of this it could account for some of the fuzziness in your pictures.
People think that since the camera is autofocus they don't have to worry about focusing. That is not true. If you are too close to the subject for the zoom setting the camera will focus as close as it can, but that may not be close enough. Please keep in mind that you can see the focus on the lcd screen. This was a problem that I had until I figured out that I was not paying close enough attention to what the lcd screen was showing me.
Some color patters will also not display properly on the screen. You can sometimes see a moire pattern in your subject material (I had this happen when I took a picture of a cedar chest covered with a colonial cloth pattern). If you see this it will show on the picture. Just change angles or distance from the subject to make the effect go away.
Q: Does the JPEG compression (standard vs. fine) affect the "sharpness" of the picture?
A:
There are different levels of jpg compression. Digital camera
uses a high compression rate so they can store the most images
with out sacrificing quality. But that quality has to be enhanced
with good graphic software such as Paint Shop Pro, Photo Shop,
Photo Finish (Soft Key) to bring out the best of the pics.
First; lighten or darken the image as it suits you, with the birghtness
controls or gamma correction within the graphic software. (I use
gamma with great results.)
Second; Soften the image 1%, or just enough to remove the jpg
compression image bits. Enlarge the image about 4 to 1 ratio so
you can see the changes close-up.
Third, you can sharpen the image 1% (Sharpen Slightly) to make
the picture appear in sharper focus if need be.
LIGHTING
Q: What can I do for low-level lighting, indoors, since the flash is so strong?
A:
I'm considering buying a video camcorder light to use indoors.
I found some video lights at Best Buy. They are rechargeable and
would probably solve this problem. Just fit the light on the top
of a camera bracket in the flash socket and attach the Mavica
to the lower part of the bracket and you're in business. The brackets
were available next to the lights for about $11.
IMAGE BARS IN INTENSE LIGHT
Q: I often notice that dark bars occur in the PC screen image in the bright area (where the sun is going down) of sunset pictures. I don't recall seeing it in the viewfinder. Has anyone encountered this and have a fix?
A: Belive it or not, this is called the "smear" phenomenon. There is no fix that I'm aware of. It's mentioned in the troubleshooting section of the manual, page 42-EN.
"RED" TINT TO PRINTS
Q: When printing to paper, all inside shots have to much red tint on the pictures. All looks fine on my monitor but when printing out to hard copy this problem comes up. I would think my problem was in the my HP722 printer but shots taken outside come out great, so it must be something in the lighting?
A: The weaker the tungsten light used on the subject the more redish brown the color cast.
I'm familiar with the problem you're experiencing, I have an HP890Cse printer. But the problem isn't with the printer. If you enlarge your pictures you'll see the red pixels. It appears to be something to do with the white balance of the camera's video system. I use several paint programs, including the one that came with my mavica. I have manually adjusted contrast and brightness, shifted the hue and saturation and have obtained good results with my pictures but have not always been happy with the results. I hate to suggest spending more money to solve your problem but that's what I'm going to do myself. John Gist sent me a copy of one of my photos which he enhanced using Kai's Photo Soap which costs about $45. He also showed the following two shots on his picture of the day board.
A: The first shot, below, is the original. The second shot was adjusted using Kai's Photo Soap. Just one click on the enhance button cleared up the red cast on the picture. The program does more than I can say on this forum but thanks to John Gist I am going to get a copy of this program. It's interesting that when I mentioned this red cast problem (which everybody knows about) to Sony they hadn't heard of it. I told them they should poke their heads out of their offices more often and see what's being said on these forums.
Microsoft PictureIt! Tint Correction also takes care of this problem.
CONTRAST COMPARISON
Q: When taking pictures in contrasty conditions - like a object against the sky or other brighter background - I get a thin dark line around the object. Is there any way to avoid this? What's the best way to remove it using a photo processing software?
A: I don't think there is a way to avoid the dark lines. You can use editing software to brush them out. I use Picture Publisher 8 to do this. You might be able to do it with Photo Studio 2, but I deleted the software so I can't say for sure. Here's a shot I took of the moon to show the black line you are talking about and the altered image.
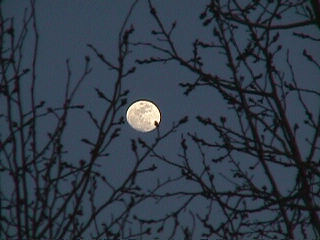

You can blow the picture up very
large and edit each pixel with a brush to correct the problem
or try doing what I did. I placed a circular mask over the white
area of the moon just inside the black line. I then inverted the
mask. What this does is protect the moon area from being altered.
Then I took a clone tool and cloned the dark blue color over the
black line. Remove the mask and you're done!
MAVICA SETTINGS VS. PHOTO TYPES
FIELD, FRAME
Q: Why do my portrait pictures shot in FRAME mode seem "fuzzy"?
A: There are many things that can cause the picture to be fuzzy. How do regular pictures turn out, such an a shot of your house or a scenic shot of the neighborhood or some distant object? What do you mean by a portrait shot? Are you taking the portrait inside with room light or outside in sunlight? What are the light conditions when you are trying to take a portrait? When you are taking the portrait is the image in the lcd screen focused? The answer to some of these questions may tell us what the problem may be.
If you're just over a meter from your subjects and are zooming in to frame your shot (and that's what I suspect you are doing, just like I do), I suspect that you are taking the portrait just beyond the minimum focus distance for the zoom setting you are using. Check the zoom indicator when you are taking your shots. Remember that if you are using full zoom you can't be closer than 3.5 feet from your subject or it will be blurry. At three-quarter zoom you can't be closer than 2.5 feet from your subject. Also, in low room light the camera has a hard time focusing and the pictures sometimes come out a little grainy. Try turning up the lights in the room and see if that makes a difference.
The auto focus system works by measuring the contrast of the image. Naturally when the image is focused sharply then the contrast is highest and this is where it will set itself. But... If you have a low contrast subject or low light situation, the brain can't really tell by measuring so it may not focus perfectly.
I have been experimenting with my FD7 and discovered an interesting effect when using frame mode. I was taking pictures of a lighted ceiling fan in sports mode to see if it could stop the blades. It did of course. But then I thought of taking exposures in field mode and frame mode. In field mode the blades made a 1/4 circle blur on the picture. In frame mode the blades made a complete circular blur on the picture which turned out to be a really neat effect. If you use frame mode in conjuction with the sports mode you get two sets of blades in the exposure, which is also a really neat effect!
Q: Why do some pictures have "jaggies" on straight edges, especially on an angle?
A:
The jaggies have everything to do with the mode of the camera.
They result from scanning at only 240 lines vertical and then
interpolating to 480 lines vertical. That's why you only notice
the jaggies along straight lines and even then only those lines
at about 20-30 degrees from horizontal or vertical. Fine mode
(75% quality, 25% image compression) is becoming more standard
for jpeg compression. Standard mode (50% quality, 50% image
compression) is more typical for jpeg compression. It is used
to provide minimal image impact (loss) vs image size. At 100 percent
quality there is virtually no quality loss due to compression.
The reason there are still some slight jaggies in frame mode is
because 480 vertical line resolution is still not enough to produce
a truely straight line.
I was originally concerned about holding the camera still when
using frame mode. The manual recommends using a tripod. I have
since found out that a little movement (actually quite a bit)
is allowed in frame mode. I took two pictures of the pendulum
in my grandfather clock, zooming in so the round pendulum weight
filled about 1/4 of the screen. Both the field and the frame shot
came out clear! Frame mode pictures of moving car do, however,
come out blurry. So I guess, for those concerned about frame mode
pictures of people, the people don't have to stand like statues,
but slight movement shouldn't be noticed. Remember though that
flash pictures automatically set the camera to field mode!
I was conversing (arguing with is more like it) with someone on
the PEIMAG board about why someone would choose the FD7 over a
mega-pixel camera. The big reason is of course the zoom, not to
mention all of the other features. My reply was that the mega
pixel user could simply crop their image and get a better picture!
I didn't reply but is that REALLY true. To a point yes, but let's
take it to the extreme. The FD7 has a 10:1 zoom. That means that
when you zoom in all the way you are taking a picture of an area
1/10 the size of your 40mm view.
If we translate this into mega-pixel terms, saying that the mega-pixel camera has the same 40mm lense (most don't, their about 46 to 56 mm), the cropped area of an 1152x864 image (DC210) would be 115x86 pixels, which is pretty bad resolution. The point is this, the zoom lense allows FD7 users to capture images the others can not, unless they want to do a lot of driving or walking to get the same perspective. I'm not disputing the higher resolution of these cameras, they take fantastic pictures, but here's an example. Happy shooting!
IMAGE INTERPOLATION
Q:
Can anyone tell me what an "Interpolated" image is?
I've heard it's some way the digital camera develops a photo.
A: Technically, an "interpolated" image is one
that has been changed in size from its original pixel dimesions
and/or pixel depth. During the change pixels are added or taken
away. The two main methods for computing the change are "bilinear"
and "bicubic". Bicubic is preferred for image quality.
The Mavica takes field mode photos in 640x240 mode. Then it computes the extra pixels need to form the 480 dimension of the image and sticks them in between the 240 rows already there. In frame mode the Mavica actually takes two exposures that are 1/60th of a second apart. Each exposure adds 240 of the pixel rows to the 480 dimension so these shots are un interpolated.
Q: That would then explain why in very bright light conditions (backlit scenes, illuminated subjects in a dark room...) in standard mode diagonal lines get this "saw teeth" effect, right?
A: Well, nothing's easy. Yes, and no.
The Mavica uses JPEG compression to make a 900K or so image take up only about 50K of space on a standard 1.4K floppy. This lets you get about 20 images on the disk in "fine" resolution. JPEG compression adds to the problem of the "jaggies" especially on diagonal lines. They will be more prominent on pics taken in "field" mode than in "frame" mode.
Experiment and be aware of the differences.
But don't be afraid to use field mode. It is the "preferred"
means of hand-held "on-the-fly" shots. Your mileage
may vary.
EXPOSURE
Q: How does the Mavica EV (exposure value) work compared to a 35mm film camera?
A:
The metering system in digital cameras, as in 35s, is based on
a "neutral grey" average--60% grey. Whether what you're
shooting is black (close-up of black dog) or white (snow scene),
the meter will "think" it's mid-grey. If you want the
dog to look black, use the "-" settings & see which
works best. If you want white snow, use "+" settings.
This is MUCH easier when you can delete the ones that don't look
as good! (In 35mm, this is called "bracketing" the shots.)
All of the above has limitations, and you'll see just how far
you can go with a little experimentation. Before you dump your
640 X 480 res camera try some of the above.
The nice thing about the Mavica is being able to check out the
LCD view to see whether you've increased or lessened the light
sufficiently.
Please keep in mind that the EV adjustments may not always compensate
enough for the lack of adequate light. Make sure that your lcd
screen brightness is adjusted to accurately depict what you are
trying to take a picture of. Inside, adjust the brightness down
to match the actual scene you are capturing, then adjust the EV
setting. You can see the EV adjustment in the lcd screen as you
change it. If the screen image is still too dark they you will
have to use the flash or turn on more light. The mistake many
people make is having the lcd screen too bright, making the pictures
appear to come out too dark. The lcd screen brightness does not
affect the captured image, but it can give you a false impression
of how your shot is going to turn out.
LENS COMPARISON
Here is an EXCELLENT lens comparison page created by Bob Nathanson.
I was going through all of my old Canon A-1 stuff. I can't believe how much I have - 35mm, 55mm, 100mm macro, 135mm, 200mm, 2x ring, bellows, slide copier, etc. (All original Canon FD) I found a boatload of 55mm filters that will end up in use on the Mavica as soon as I perfect my mount (I will share later how I do this - after I do it that is). Thinking if I should get a slave for the Vivitar 283 flash - I have both the filter kit and lens kit for the 283 and the bounce flash attachment.
ADD-ON, WIDE-ANGLE AND TELEPHOTO
Q: How are the add-in lenses held to the camera? Do they use the notches with which the lens cover attaches?
A: You guessed correctly. An adapter fits into the same notches which the lens cover uses and the lens fits into the adapter ring. Here are pics of my Wide-Angle lens. The TelePhoto works the same way.
Adapter Ring Front/Rear
The adapter ring is "split" to RELEASE (withdraw) the "dogs" which hold it to the camera, or LOCK to firmly hold the adapter to the camera body. The Wide Angle Lens (about 1.9x the 0x setting of 40mm) from the Rear/Front. I believe that this lens does have LIMITED applicability, since the focus is only from 40mm to about 220mm (half the zoom range.) I did try the TelePhoto on my Mavica, and found that the lens barrel was a "tunnel" in the picture until the zoom reached about 250mm (slightly over half of the zoom range.)
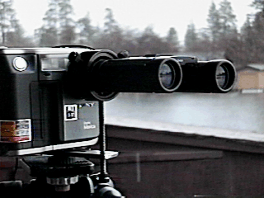
I have found an adapter ring that fits the FD7 and allows connection to other optical devices such as telescopes, microscopes, etc. I have called them but have no yet heard back. Their page links to a page showing the adapter mounted on an FD7 and some pictures taken including an eye chart at 160X. The telephone person could not give me a price but from another source I would expect it to be in the $130 area. High but not bad if you have a need. Check this BINOCULAR setup.
FLASH and FILTERs
Q: I truly love the Mavica flash, but it is too powerful. What can I do about this?
A:
So far I have three pieces of Scotch Tape, not the clear, but
the frosted, reduce the flash intensity. I think I can do better.
I found that by standing 10 feet away and zooming in, I can get
a better exposure, but that's silly. Next step will probably be
a frosted piece of plastic, taped over the flash. Some other have
suggested a piece of black tape, 1/8" horizontally across
the flash lens. (I don't know about that one.) And finally, the
extreme, using a flash slave, on a mounted external flash, with
fiber optics as the trigger, and the whole Mavica FLash, blocked
off.
What would be nice, is a simple way to add or remove the diffusion
filter. That way for long flash the unit is very good, and for
close-ups, you could slip on the reduction device. For now, the
semi-clear tape is working. Probably need more layers.
Q: Has anyone tried to rig a standard photo flash to the Mavica?
A: I was looking for a shoe mount camcorder light with built in battery. With my old Vivitar flash bracket and a camcorder light, I could give up on the built in flash problem AND get full use of all of the Mavica's settings. I am taking ID photos for our Lotus Notes HR Database at work (walking around to all of the different departments - no studio setup) and I have too much shadow in the eyes and under the nose of most of my shots. I would also be able to use FRAME mode!
In the video section of Sears, they sell a camcorder light with a built in NiCad battery along with a charging 'brick'. The light is 'shoe' mountable. $39.95 I believe the light is 10w and runs 20mins per charge. Both the bulb and battery can be replaced.
With this setup, you would have full control of the Mavica's features including FRAME mode. No more red eye problems and you would see in the lcd screen how the light will effect your shot before you take it. Also, with the Sears light and the swivel mount on the Vivitar bracket, I would have unlimited bounce settings.
Thanks and a tip of the hat to Robert
Newman for sharing his flash research. Robert
Newman's site has some great flash pictures taken with his
rig, using a Vivitar 283, as well as instructions for how to make
a similar setup.
A: The basic idea is to use a handle bracket, a 'real'
flash attachment, and a slave trigger. Then you use the flash
from the Mavica to trigger the 'real' flash. BUT, you also must
restrict the light coming from the Mavica's flash. I tried it,
and am VERY happy with the results! Beautiful flash pictures,
perfectly exposed, both direct and especially bounce.
I got a flash bracket, a Vivitar 283, and a WEIN slave trigger.
I didn't have a fiber optic cable to route the light from the
taped-over Mavica flash to the slave trigger, but I found that
if I covered the Mavica flash in such a way that a little light
got out to the side (NOT THE FRONT) in the direction of the slave
trigger, which is just 2 or 3 inches away, it works fine. When
the Mavica flash goes off, the Vivitar flash is triggered. Just
be sure that you don't get much Mavica flash going forward, as
this will give you too much light, and only the Vivitar's will
be automatically controlled.
Things would be much easier if Sony had put a flash socket on
the Mavica, but if frogs had little wings they wouldn't bump their
butts when they hopped, either. I was in Best Buy today and stumbled
across some video lights made by Sima. There were two models,
one with a 20 watt light for $35 and a twin light model (10w &
30W) for $50. Both lights are powered by a rechargeable camcorder
battery. The battery and charger are included in each package.
FILTERS
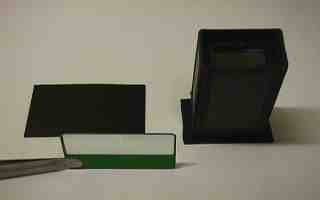
I got hold of a set of samples from a company making all sorts of light filters. Among these were neutral density filters for reductions of 0.5 - 1 - 2 - 3 - 4 stops. Using some black cardboard, I cut a hole for the Mavica lens and another for the flash and taped some filter over the latter.
The first picture shows the filters and the device taken in room light.
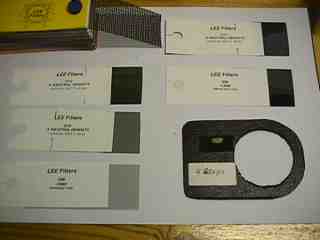
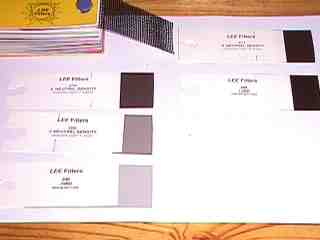
The second picture was taken with
the flash and the 4 stop filter at a distance of 70 - 80 cm. Also
shown is a piece of opaque material with small punched holes -
could also be used. The filter company is Lee
Filters.
TRAVEL PLANNING WITH DIGITAL CAMERAS
Q:
My Wonderful husband gave me the Mavica FD-7 for Valentines Day.
I really love using it. I have enjoyed the Web pages. I tried
to download Photo Vista from Live
Picture's web page, I did get the Demo to work and I do have
the file but it didn't unzip.
A: The executable file is just that, "executable"
by itself. Did you RUN it? This will install itself on your harddrive,
ready to run.
Q: I notice you used an applet to make the photos scroll,
can you do this with Photo Vista as well? If not how do you get
this applet? The first thing I thought of when I saw the panaroma
photos was how cool it would be if they would scroll. If I had
a 360 degree panaroma would that still work the same
A: PhotoVista
has a "Viewer" which runs on your own machine after
you create a Panorama picture. This is also an APPLET for facilitating
others to view your Panorama. Check the HELP pages of PhotoVista.
Q: When I thought of it I saw it as a continuous seamless
scroll. Is this possible?
A:
I discovered a scrolling applet from LiquidCool
which have many interesting applets! The one I bought is ImageScroller.
Q: I want to figuare out how to do all this before I go
to Washington, so I can take the right kinds of pictures to do
the best job.
A: Take LOTS of diskettes and your battery charger. Take
a TRIPOD. Set up the camera on the tripod and position it in a
central location for the view you want to capture. Plan to shoot
a WIDE-ANGLE shot every 30 degrees around the tripod. Start at
the logical location for the beginning of the pan (especially
if you use less than 360) and shoot, left-to-right, sequentially
to the end (or back to where you began.) This will give you 12
pictures from which to STICH a panoramic view. You can use some
telephoto versus WIDE, but you will need to shoot MORE pictures,
and you MUST watch for distinctive elements on the right side
of one picture and also in the left of the subsequent picture.
Q:
Maybe someday, (when I learn how) I would like to put up a Web
sight on the ring.
A: You can get FREE web space at several locations: GeoCities
OR Tripod OR Switchboard
OR AngelFire. To start
learning HTML, the language of a WebPage, see Microsoft's
version OR Netscape's
version. The Univ.
of Florida has good HTML help, as does Enter.Net.
A page of extensive links to help for authoring
were gleaned from the first of 38,745 pages which came up on a
HotBot search.
A quick HTML reference.
WEB-BOARD POSTING
1. You really do need to get your
own Web Site. Try one of these "freebies":
1.a. Check GeoCities
OR
1.b. Check Tripod OR
1.c. Check Switchboard
OR
1.d. Check AngelFire
2. Get WS_FTP
from ZD Net (they have both 16-bit and 32-bit versions)
3. FTP upload your selected pictures from your hardrive to your
web space
4. Check the upload by browsing your pictures (and save the URL
of the picture)
5. Go to the Mavica
WebBoard and compose a message
5.a. Include your picture by typing <IMG SRC="http://111.111/22222/33333.jpg">
where 111.111 is the web space provider URL, 22222 is your web
page locator and 33333.jpg is the name of your picture file on
your web site
6. Click on the "Preview Message" button at the bottom
of the posting screen
7. Review the message you want to post
8. Click "Confirm" to post OR the browser BACK button
to adjust something in the posting and repeat from step 6 above
until you choose "Confirm"
9. Enjoy the success of posting a picture on the Mavica WebBoard!
CHARGE, LIFE
I also have used mine until the battery time went to zero. I took
about 11 more shots and then had to change disks and did the battery
at the same time. Like a lot of cars.......empty only means fill
me up very soon, not bone dry.
I have managed over 300 pictures on a single FULL charge and just
under 200 on a partial charge (when the light first goes out).
In general it depends on the non-shooting on time (viewing, composing,
etc.)
Sony admits that the 500 is on a FULL charge taking them one after
another without stopping other than to change disk. I feel that
250 is always safe and I'm certain in a pinch that 300 will also
work. I would never count on more than 300. That is why I carry
a second battery. If I need more than 600 shots in a day, I hope
somebody is helping carry the disks.
I have charged mine from a power inverter in the car. I got caught
without an adapter for the power in another country (other than
the USA) and it was the only choice. Worked just fine.
PORTABLE, AUTOMOBILE, FOREIGN SYSTEMS
I travel to southeast Asia quite frequently. The electrical system there is a 220 volt system, not 110 volts as in the U.S.A. The plug outlets there are the same as ours, but I don't know if the charger can handle 220 volts or whether I need to buy a converter before I go. Does anybody know?
It will work just fine. The only thing you might need is an adaptor plug for the local style outlet. Actually the charger seems to work better on 220/50. I use mine in Europe all the time and charging is slightly faster(205 maybe)
MAVICA HARDWARE TOPICS
RUGGEDNESS
Q: How rugged is the Mavica. The internal floppy drive if anything like that in a desktop computer should not be handled roughly. Also how about humidity. The manual covers these subjects but rather vaguely. I am almost afraid to let mine dangle on the neck strap and "bang" against my chest. Would appreciate comments.
A: I have no idea how much punishment the floppy drive can take, but I guess we'll see as the weather gets better!
I currently have a neckstrap on my camera, but I fully intend to swap it for a hand-strap. MUCH more reliable, and easier to hold the camera, too. I believe you can use the handstrap from the Handycam, as there are lugs on the upper and lower corners of the right side.
I will be stopping at my "friendly" Sony repair center this week to see what they have to offer. I did see someone post about making one for themself. It sounds like that will be the way to go, but I want to stop there anyway. I'm SURE with this enthusiastic crowd there are a few "joggers" who will be taking the camera along on a run, and we'll see how it fares.
A: First hand experience on the durability of the Mavica. My wife dropped my Mavica onto an asphault parking lot. She was wearing gloves and using hand strap; she took glove off and the Mavica too! The good news, the camera still functioned fine after the drop. The bad news, the covers cracked and almost $300 dollars later (mimimum labor charge plus front and rear covers)and 2 weeks without camera, it was fixed. The camera now has a neck strap and the hand strap now holds dust in my bottom drawer. Withstanding a drop, the camera is pretty durable.
A:
I took my camera to India. The roads are rough the heat and dust
terrible and a fairly high humidity.I also dropped it on a concrete
road.It got some rough handling but worked perfectly. It seems
to be a reasonably tough device.
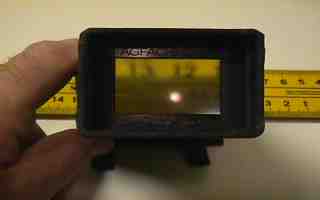
LCD VIEWER COVER
Following ideas from somebody on this page I put this together from pieces of black cardboard, black tape and a cheap fresnell-type looking 'glass' ( plastic) plus some Velcro tape. One strip is fixed to the camera with double-sided sticky tape.
This shows the materials for the device:
Just to show the function of the lens - it allows me to see the screen without glasses which I dont normally use outdoors:
LCD VIEWER HOOD
I've been using the Sony MVC-FD7
digital camera outside in bright sunlight and have been frustrated
when the LCD screen washes out. Attempts at shading the screen
with a hand or hat yielded poor results, resulting from the high
ambient light and light-adapted eyes plus sunglasses.
I constructed a small rectangular light shield (about 3"
deep) using light cardboard. This helps somewhat and is also foldable
and easily stowed. But its effectiveness is limited in bright
sunlight due the previously-mentioned factors. You can see enough
to frame your shot, but that's about it. Forget about manual focusing!
Others (see the Mavica forums on the Web) have used black viewing
hoods. These are quite effective, but should we be using technology
borrowed from Matthew Brady on a high-tech camera?
An Improved Shade
I did find a reasonable solution
to the problem of viewing the LCD screen in bright sunlight. I
modified a Viewcraft Lupe (their spelling, not m ine), which is
a 5X magnifying loupe (about $17) with an attachment that allows
you to easily view uncut 35mm negatives strips. Discard the film
attachment and use black plastic electrical tape to cover the
transparent lower portion of the loupe.
Apply some black self-adhesive felt to the bottom edges of the
loupe. This portion will be in contact with the LCD screen. Cut
the felt away from the active viewing area with a sharp X-acto
knife, being careful not to remove the felt on the bottom edges
of the loupe. This completes the modification.
Using the Shade
To use, place the bottom of the
loupe against the LCD screen and place your eye up to the loupe's
eyepiece. Note that the loupe's eyepiece is slightly angled. Orient
the loupe so that the eyepiece is up, so that you are looking
slightly down on the LCD screen. This is the optimum viewing angle
for the screen.
When holding the camera with both hands in front of you, you thumbs
naturally fall into position to hold the loupe against the camera's
LCD screen.
HAND STRAP vs. NECK STRAP
Q:
Anyone know where I could find a good small hand strap to attach
to the side of the camera where the shutter button is (both at
the top and bottom)? I would like one that would wrap around the
outside of my had as I hold it for taking shots. Any Ideas?
A: Actually I tried to find something myself and no shop
or supplier (including Sony) had anything that fitted... So I
MADE ONE! I bought one of those multi-usage straps in a camping
and hiking store, one with a buckle that locks. I inserted the
stap in both lugs to double it, made two small retainers with
the same material and glued with silicone to hold everything together
and now all other Mavica owners ask me where the hell I found
that strap! If you want I can e-mail you a picture of it so you
can make one for just a few dollars. Much better than the neck
strap!
BAG COMMENTS
I bought a nylon CD player bag at Walmart for about $9.00 and for me it works perfectly. The main part of the bag has a zipper top and is just right for the camera. There is a pull-down pocket in front which will hold several floppies. It is fastened with velcro. Also, the whole thing fastens around your waist and you don't even know it's there. I don't know who makes it, but I'm sure if you go into one or more Walmarts, you'll find it. There is a label sewn on the front that says "Conductor".
I got a Case Logic DC70 bag ($20.00) which fits the camera and a few things nicely, but there isn't any room for extras like lenses, charger, etc. I seem to remember someone mentioning the Case Logic brand, but I think they said a different model #, and the pamphlet that came with the bag didn't show other camera bags, just laptop bags, and other stuff.
I noticed the last time I stopped by this site the bag questions. Thanks to all who offered suggestions. I've found that a Caselogic model that was made a few years ago for removable Panasonic auto CD players is all but perfect. The model number escapes me however. Had one left over from a car that was sold with CD player in place. It holds the camera, 5-pack of 'film' spare battery and cleaning kit.
I got a Case Logic DC70 bag ($20.00) which fits the camera and a few things nicely, but there isn't any room for extras like lenses, charger, etc. I seem to remember someone mentioning the Case Logic brand, but I think they said a different model #, and the pamphlet that came with the bag didn't show other camera bags, just laptop bags, and other stuff.
When I tried to buy a LCD cleaning kit, the local (Denver) Sony Service Center said it wasn't available. I had already heard that the Soft Case (LCS-FDC) was only big enough for the camera. Sony said they had a camcorder bag that came with the cleaning kit for only $35.00. Part is: ACC-KITV1. It is called "Handycam Vision Camcorder Starter Kit". It is a leather-like material, has room for the Mavica 7 plus extra batteries, floppies, and lens adaptors (it has a movable inside divider with velcro). It also has two straps on the bottom to attach a tripod. It DOES say SONY on the side, but it is very discreet. I HIGHLY recommend it. I can attach a picture if someone will tell me how to do it.
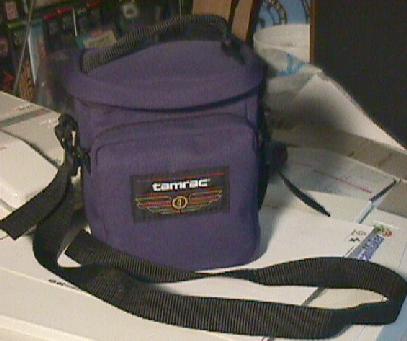
Try the TAMRAC digital camera case. The price is about $30. I have been using it since day one. Camera fit is perfect. Holds an extra battery, wide angle lens and 6 disks. Remove the WA and fit 10 more disks in the bag. The fit is perfect for the FD7.
I have a Tamrac digital camera case that cost me $17 at Sears.. is a blue/black back.. fits my mavica nicely.. a main pouch that holds my camera.. is padded..etc.. inside that is another zipper pouch that i put my strap for now.. but will fit lens I believe...another zipper pouch on the side that fits at least 15 floppies or more.. you could put the charger there as well and take out some of the floppies.. it has a carry handle on top...a removeable strap...and a feature i really like...a belt straps...makes carrying it very easy...a nice bag. I highly recommend it.
The Case Logic bag is actually made for a portable CD player - a CarMan or the like. The "main bag" portion is about 9 1/2" wide - wide enough for a CD and a half? - about 7" tall and 2" deep. This part is also where the carry strap attaches. The bag has a velcro divider that goes inside. In this part is where I put the camera and use the divider to keep the bag strap and charger cord off to the side, separated with the separator.
On the front of the main bag, there
is a square pocket on the left for the CD player. This is the
same size as a portable CD player (or just a tad bigger than a
CD box) and about 1 1/2" deep. This is a good pouch for the
diskettes and instruction manual and pad of "sticky notes"
and a pen.
On the right-hand side of the bag is another pouch, about 3 1/2"
wide (and still 7" tall and 1 1/2" deep). This is a
perfect fit for the charger, though nothing else will fit in here.
I know this bag is not ideal - it has no room for extra lenses
and such (when I can afford them) - but it is perfect for lightweight
travel. The bag also has some hefty padding in case I drop it.
I found a very nice camera bag at K-mart for $14.95, leatherette, and well-padded. It has about 8" x 8" (I don't have it now, loaned out the camera and the bag to a friend to use) main compartment, which will hold the camera and the charger. (It has a little velcro divider thingie so that the charger stays upright and to the side. It has a smaller front pocket that will hold the charger cord and several floppies. It has an adjustable shoulder strap as well as a belt loop.
PRINTERS
PRINTER COMPARISONS
Q: What printers are considered to be the best value for printing Mavica pictures? I currently own a MV-7 and I'm looking for a good printer. I'm considering 3 printers right now. 1. ALP-1000 is number one so far. It is slow but output looks great. 2. Cannon 7000 / 7004 is number two. 3. Epson photo stylus is number three.
I am trying to stay under $350 and I'm looking for photograph clarity (I guess I want as much bang for the buck as possible). The printer above have been shown to me(demos) by their factory reps. I'm looking at taking a LOT of photos of my new grandchild (the first one). Any help would be appreciated.
A:
I have a HP 722C and it's great. Can't believe for $279 the quality
of picture. I was told by a
HP mfg rep that the each dot in the DPI has 16 Dots. So if you
are comparing a 600 DPI printer he said to multiply this by 16
(600 X 16). He claimed that this gives the picture much greater
clarity. I don't know, but in any event the printer is great.
A: The part about the UP TO 16 drops is correct - the HP 890/720 can produce more colors 'naturally' then many other printers. Other printers rely too much on dithering.
A: Watch out for BANDING on the Alps!!! And make sure you stock up on ribbons, this could be a problem if you run out and can't find them in stock!!!
A:
With the Epson, you can buy low cost after market ink tanks -
save lots of money!!! With the number sold, the support you will
find, and watch out for remanufactured (low cost/good quality)
ink cartridges - the HPs are a sure bet.
A:
My list would run:
1. HP 720/722
2. HP 890 (can't print banners or 3x5 cards and $100 more then
above!)
3. Epson 600
4. Epson 800
As for the Canons - you run the risk of not finding ink on the Sunday before your kids 6 week report is due. And I haven't seen anyone here talk about owning a 7000.
A: Yes, choosing hardware is always very subjective. I recently bought an HP DeskJet 890C, when my friend got his HP 720C, and I saw the quality of color prints on PLAIN PAPER! ...and the great quality on photo-paper! The reason I opted for the 890C was it handles more envelopes at a time, and is a faster printer. I do a fair bit of printing of both sheets and envelopes for my work. Plus these both have good sized ink supply cartridges.
I have printed some hi-res scanned black and white photos that actually look better than the originals! I used HP Premium InkJet glossy paper, which is pricey (about $0.50/sheet), but the results are very good. I paid $430.00 at a discount-warehouse (not Target) called B J's in the Boston area. I recommend the HP 720C for the speed, price and quality! Plus HP offers great support, too! A VERY important feature!
A: If photos only is your aim then one of the dedicated printers for photos would be best.I have the Epson Photo and the prints are up to professional standsrds. If you go to a photo store for a test, be sure to use the glossy paper or whatever is best for photos and also the brand made for the particular printer, otherwise you will not get a serious or fair test.
I've had an Epson 800 for quite a while, although the FD7 is recent. So far I've found that the paper seems to be the limiting factor. For example, I've gone to three different stores in my area, come away with three different glossy papers, none of which seem to do an acceptable job. On the other hand, the Epson brand #S041062 which is matte finish provides beautiful results. Is also not nearly as expensive as the glossy papers. Thus far I've had no luck finding the Epson brand glossy papers locally, but the hunt continues.
PAPER SAVING TIPS
Have an Epson color stylus 600 and have achieved almost perfect results using Epson glossy film, but it's expensive. The best I've found is 15 sheets for $30, but it's worth it to me, as I don't require large prints and get 6-8 pics per sheet.
I have an Epson Stylus 800 and get all my Epson paper from ExpressSupplies.com. Their prices are as good as I can find around Atlanta and their inventory is better.
For a GREAT print tool for placing multiple pictures on one print page check Photo Paper Saver.
Use any good publishing program e.g. Coreldraw, printshop,print artist etc. You will have to import your images into the program but then you can resize each image to fit as many photos on to a page as you would like. If I'm not mistaken you should have a CD packed in with the printer that has a few limited edition programs you can use.
For standard looking prints I use my word processor, MS Word 7. I have a page set up in landscape and with 4 fixed frames on the page. Each frame is 4.5"x3.38" and is spaced so that the margins around the pictures come out evenly when the pictures are separated. I have this layout saved as a document so that all I have to do is open the document, select each frame individually and import the pictures into the frames and then print. I then use a small paper cutter to separate the pictures.
OTHER MAVICA WEB PAGES OF NOTE
Mavica Underwater from Ikelite
Great Mavica Macro Photography
Accurate Image Manipulation starts from proper color on YOUR screen
Find YOUR Web Page on the Mavican Q&A Web Page BookMarques
FUTURE WISH-LIST FROM ONE MAVICAN
My wish-list is short, in the interest
of goading the marketeers into intorducing a "new" camera
that can be available soon without (I hope) hellacious major re-design.
The following would have me standing in line in a minute at the
nearest discount electronics store:
1. Higher resolution. Not knowing what CCD chips are available,
I'd be more than willing to settle for 800x600 resolution. This
would keep costs down and still give more than adequate for display
purposes. And, it would keep image size where they'd still fit
a floppy.
2. Auto-exposure coupled to the flash. This works in $20 cheapo
K-Mart cameras, so it should be real easy to include.
3. A threaded lens ring. Ideally this would accept standard sized
camcorder accessory lenses - these used to be (still are?) a dime
a dozen, and though not the best for sharp focus would open up
some more possibilities for the camera. (And Sony could later
introduce their own....oh, never mind....)
4. A shade for the LCD viewfinder. I'm sorely tempted to try to
figure out some cobbled velcro and cardboard monstrosity, though
I'd gladly pay $20 for a "real" Sony shade. (Marketeers
- can you say "ridiculous markup"? Ka-ching!!)
5. A good holding strap. The strap on my Handycam is just right
for holding the camera steady; only problem is I can't figure
out how to "steal" it without butchery. Another $$$
optional accessory, or at least a great selling feature!
6. More user selection of exposure. +/-3 EV would really be nice.
I'd gladly trade the "special effects" for more control
over real camera settings.
OK, I guess a "don't dare sacrifice these" list is in
order too:
1. 10X zoom with macro - too kewl!
2. Super-simple idiot-proof operation
3. User-selectable compression (though a finer fine would be nice!)
4. Floppies! Even 1280x960 at the current "fine" compression would still give at least 5 exposures per disk. And "film" is practically free!
5. The pure FUN of using this thing! (Let's all admit the mavica does not take itself seriously; it's gotta be fun or we toy nuts would never have bought it!)